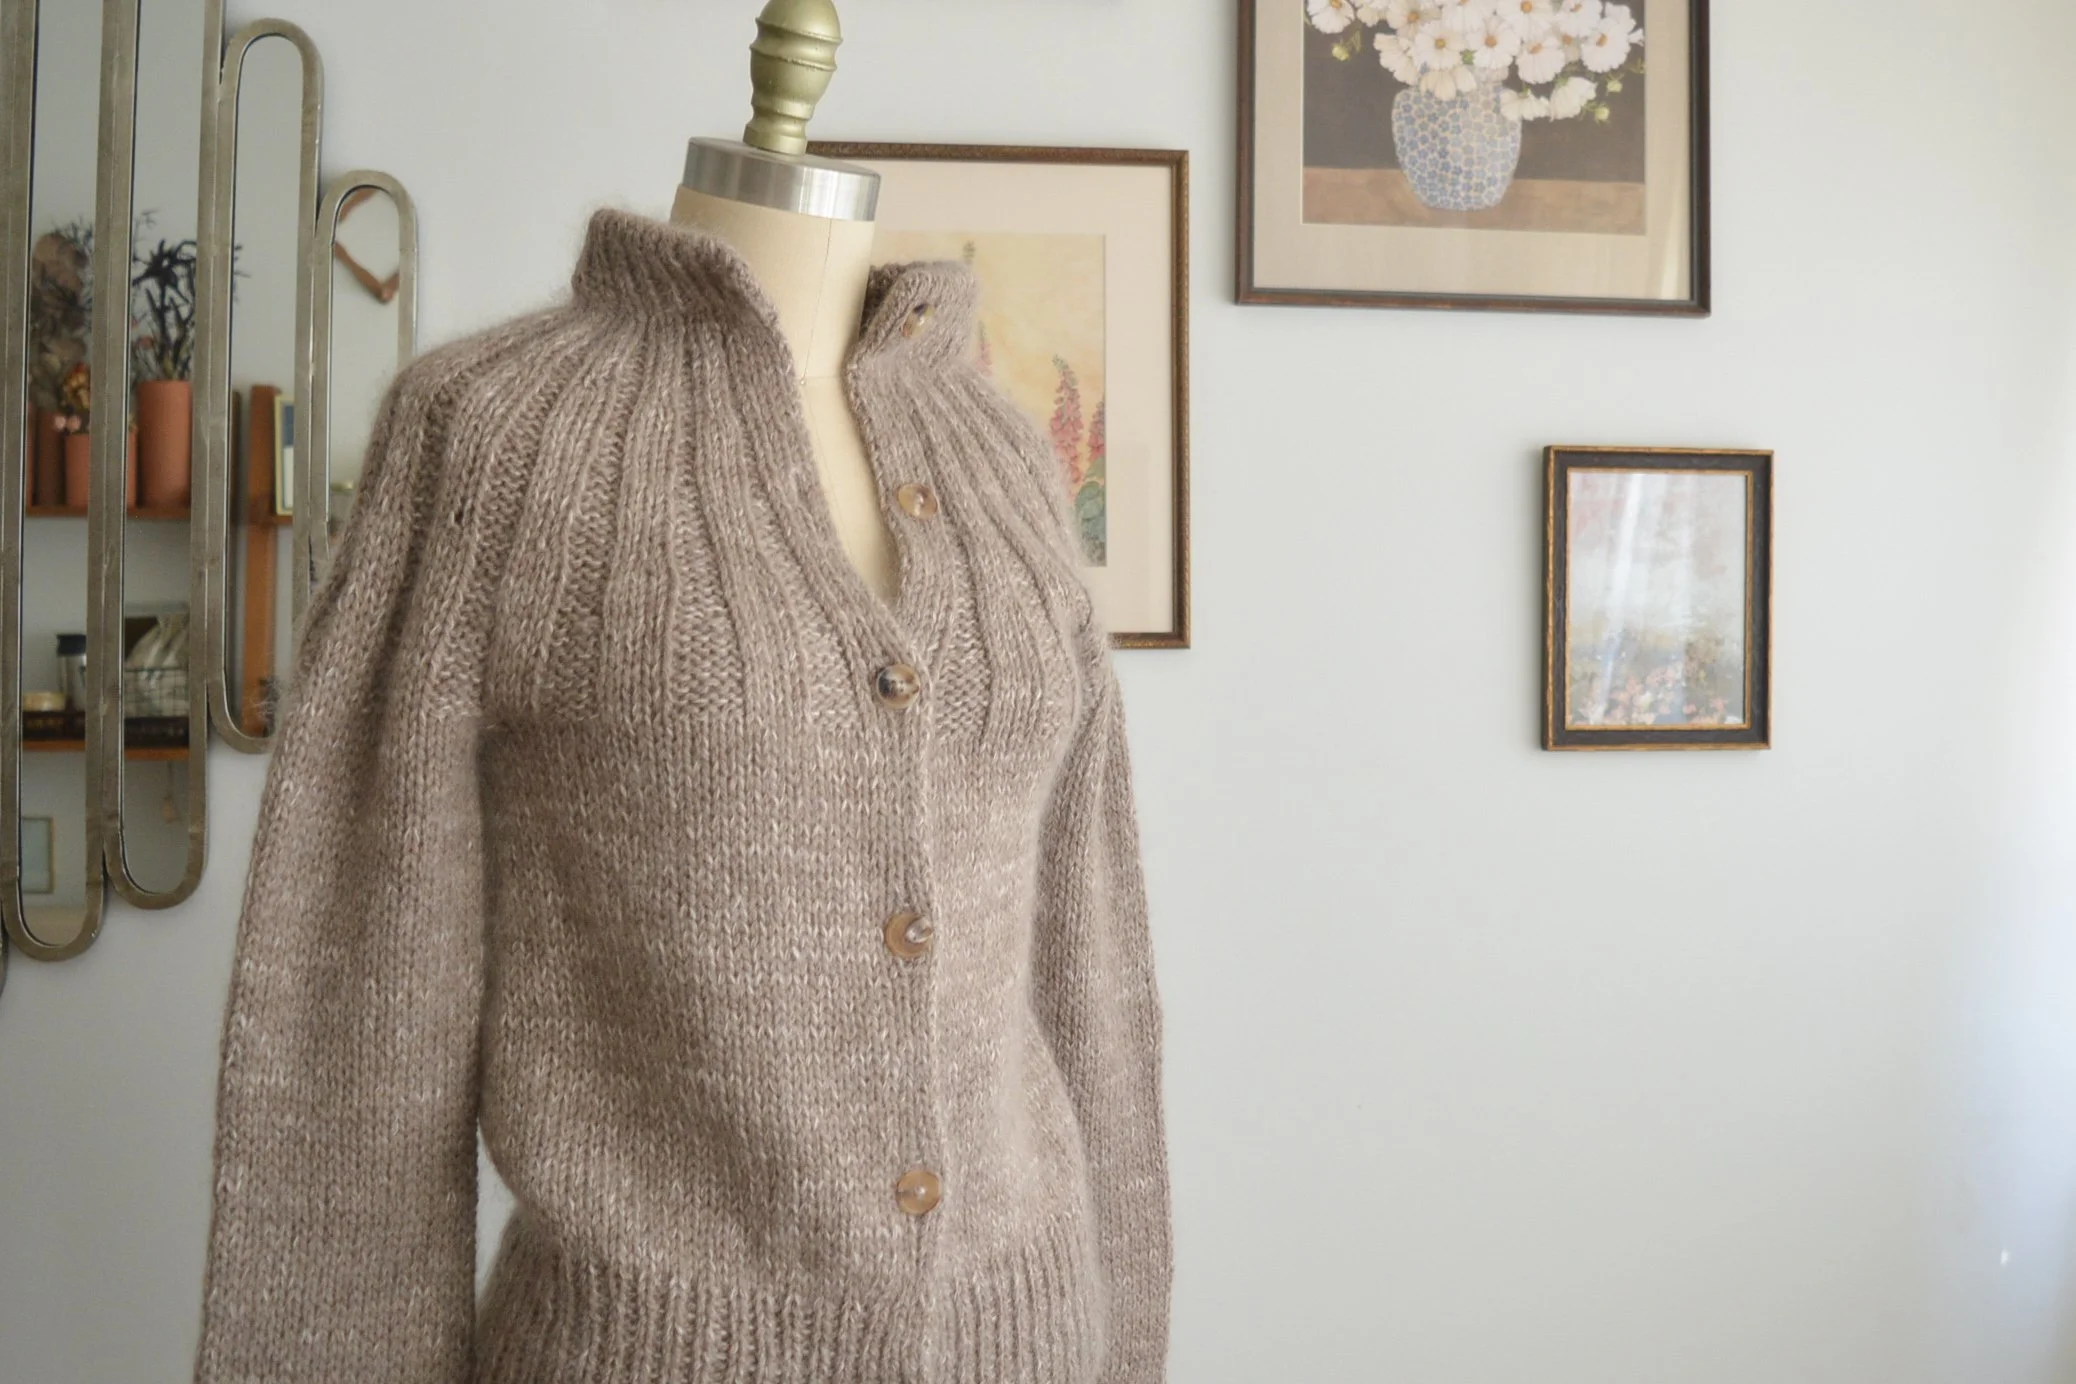
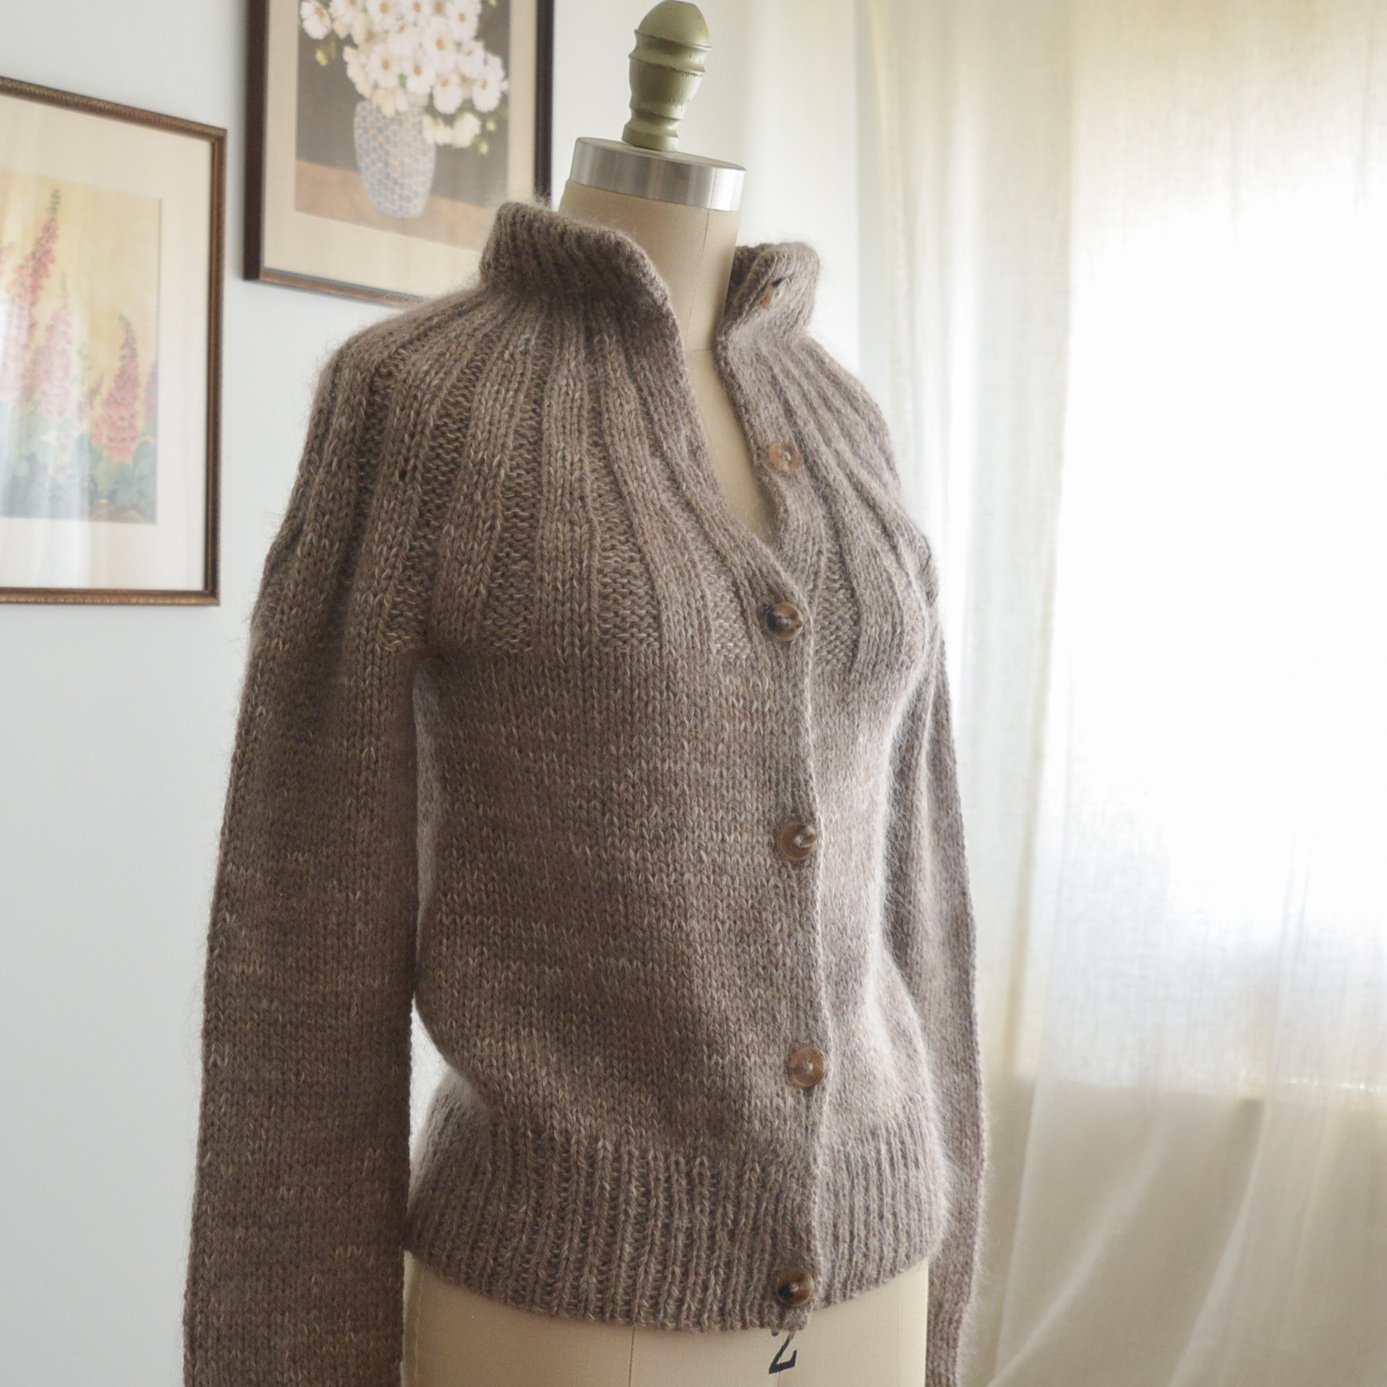
My Finished Alabama Studio Camisole Dress

This post is a part two in a series, see the first post here. Where I left off last time was right after painting my fabric pieces with the Magdalena stencil, and then testing out the couching embroidery technique on swatch. Since then, I’ve spent about a year embroidering this fabric. This was my first year of being a Mom, so most of this stitching was done while my baby was napping or while I was sitting next to him and he was doing his tummy time. Looking at all this embroidery brings back sweet memories!

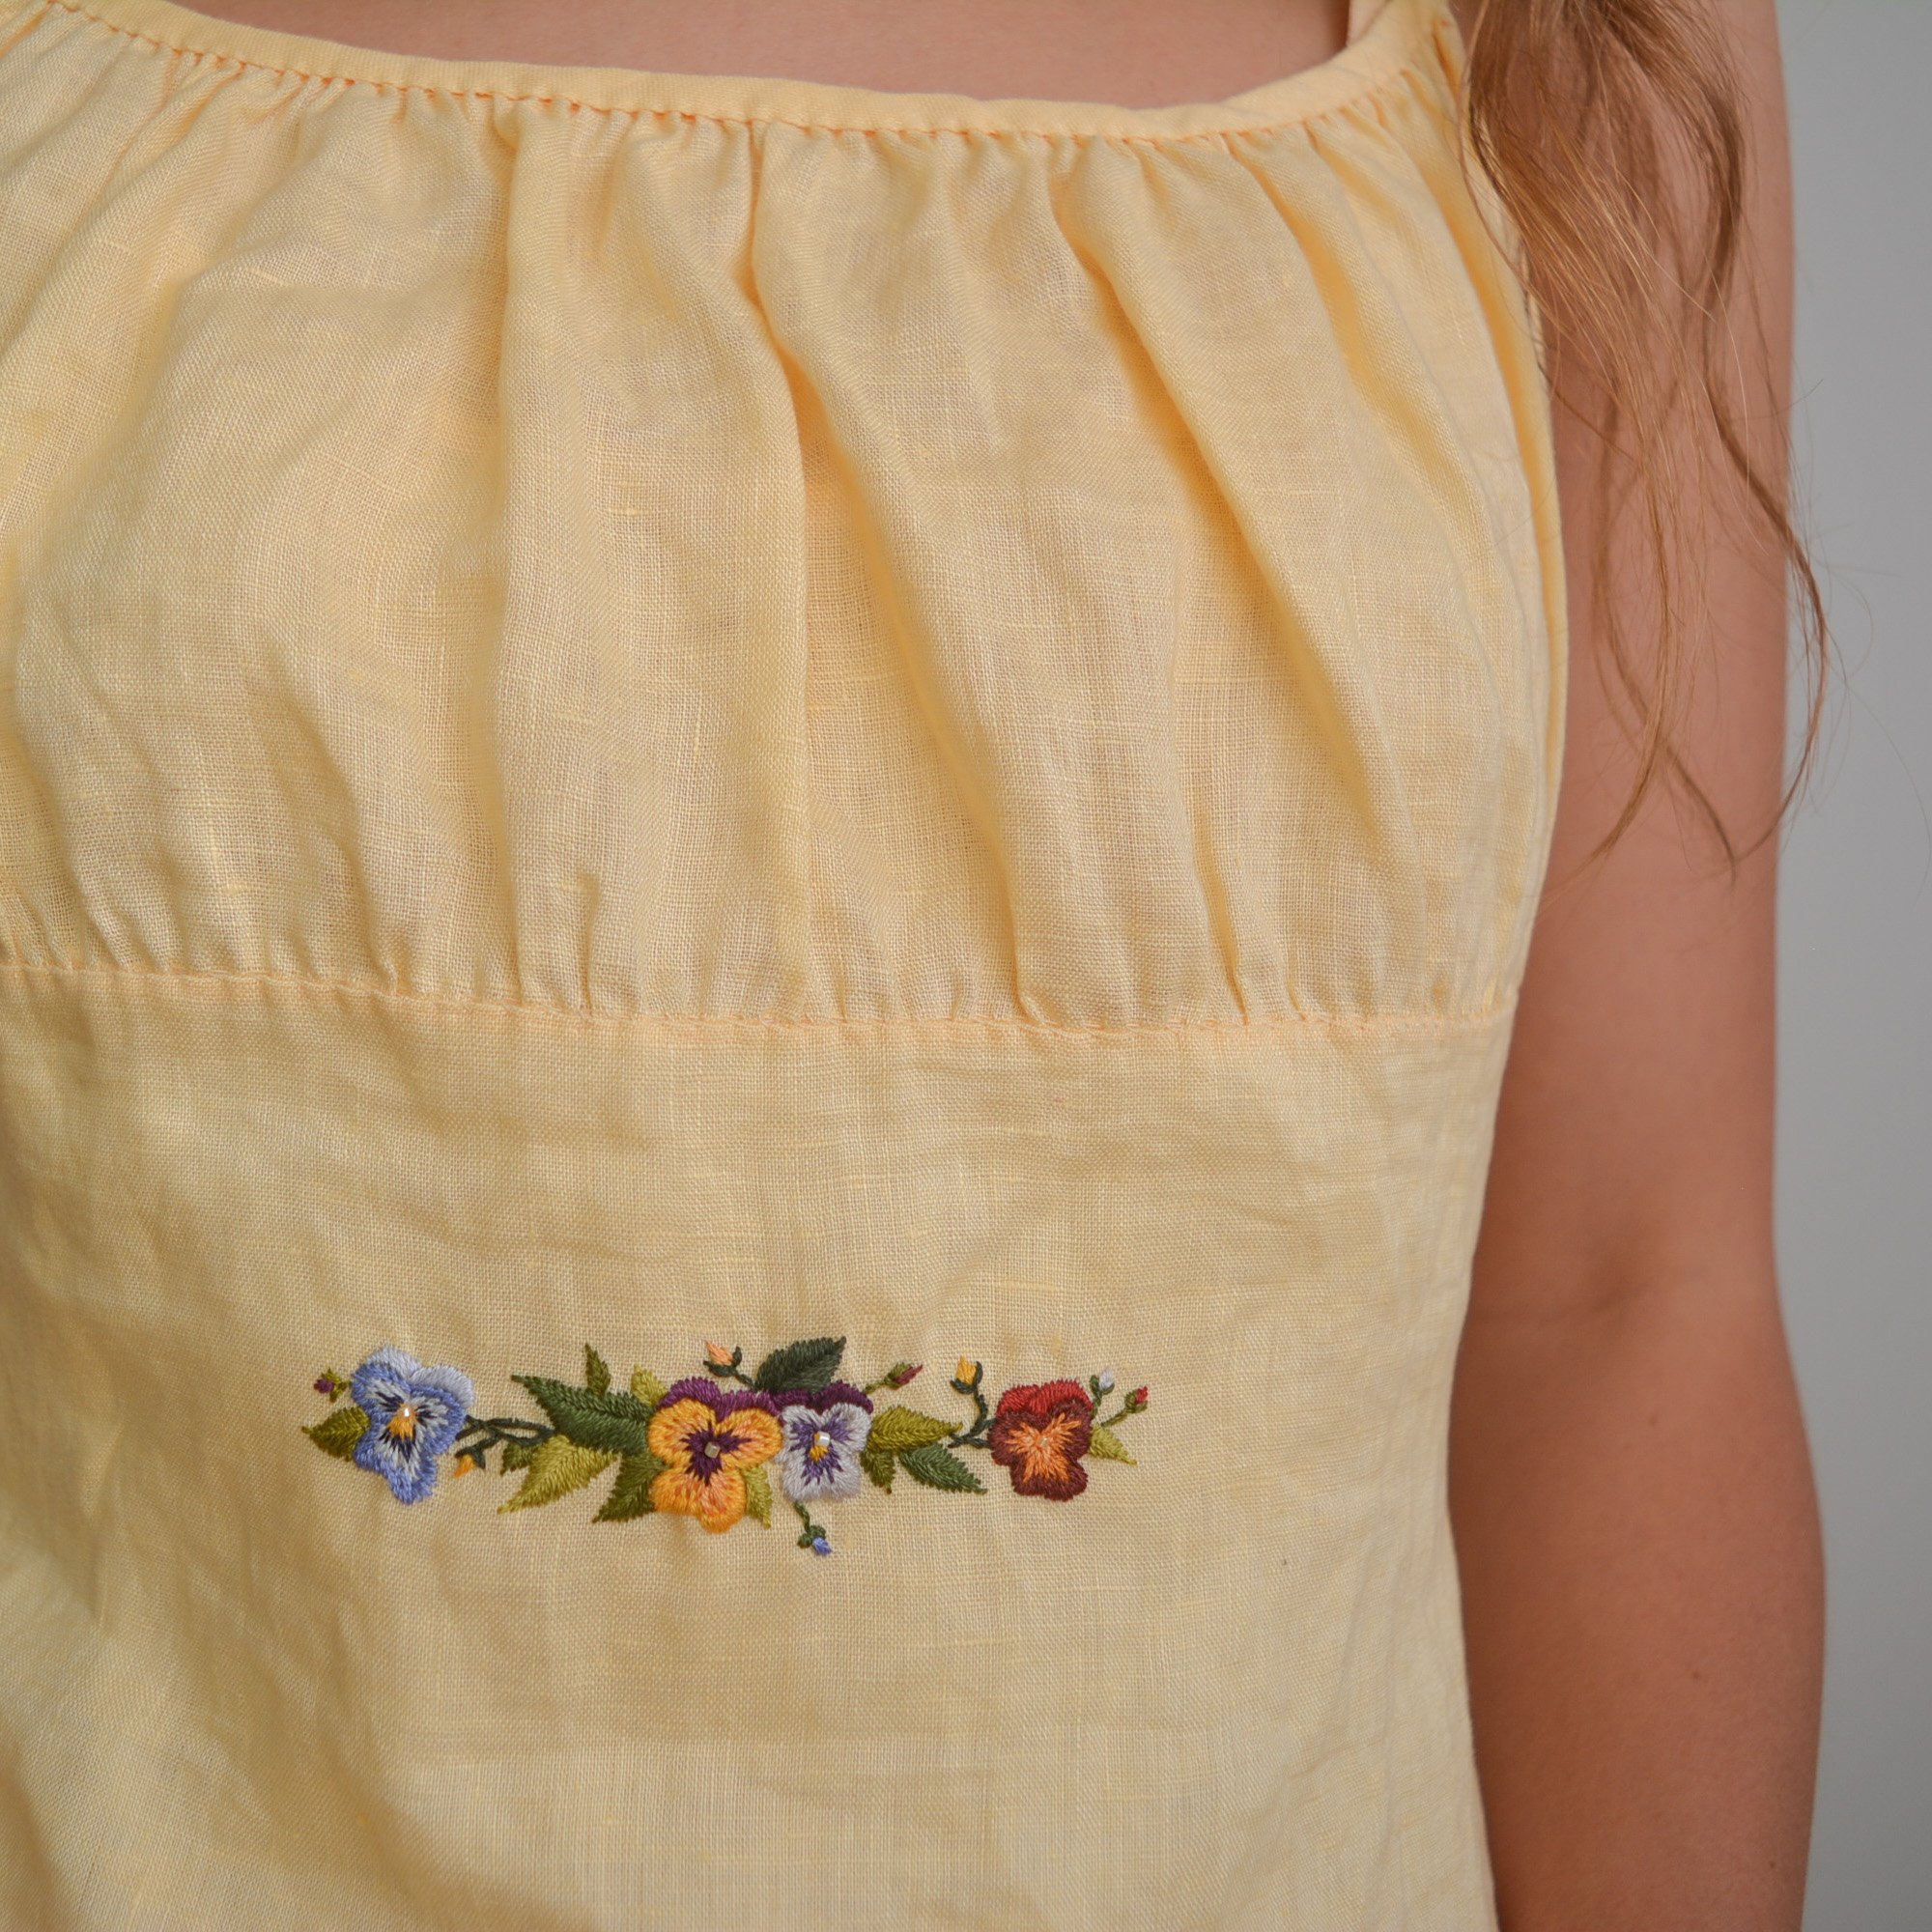
I did all of the outlines first, and then decided not to cut out any fabric within the outlines. You can see that I played with this technique in my swatch, but once I finished the embroidery I just loved the way it looked. Piecing the dress together felt like it went so fast after the embroidery, so I think I ended up putting the dress together in just one week, which felt fast considering it is all hand sewing!

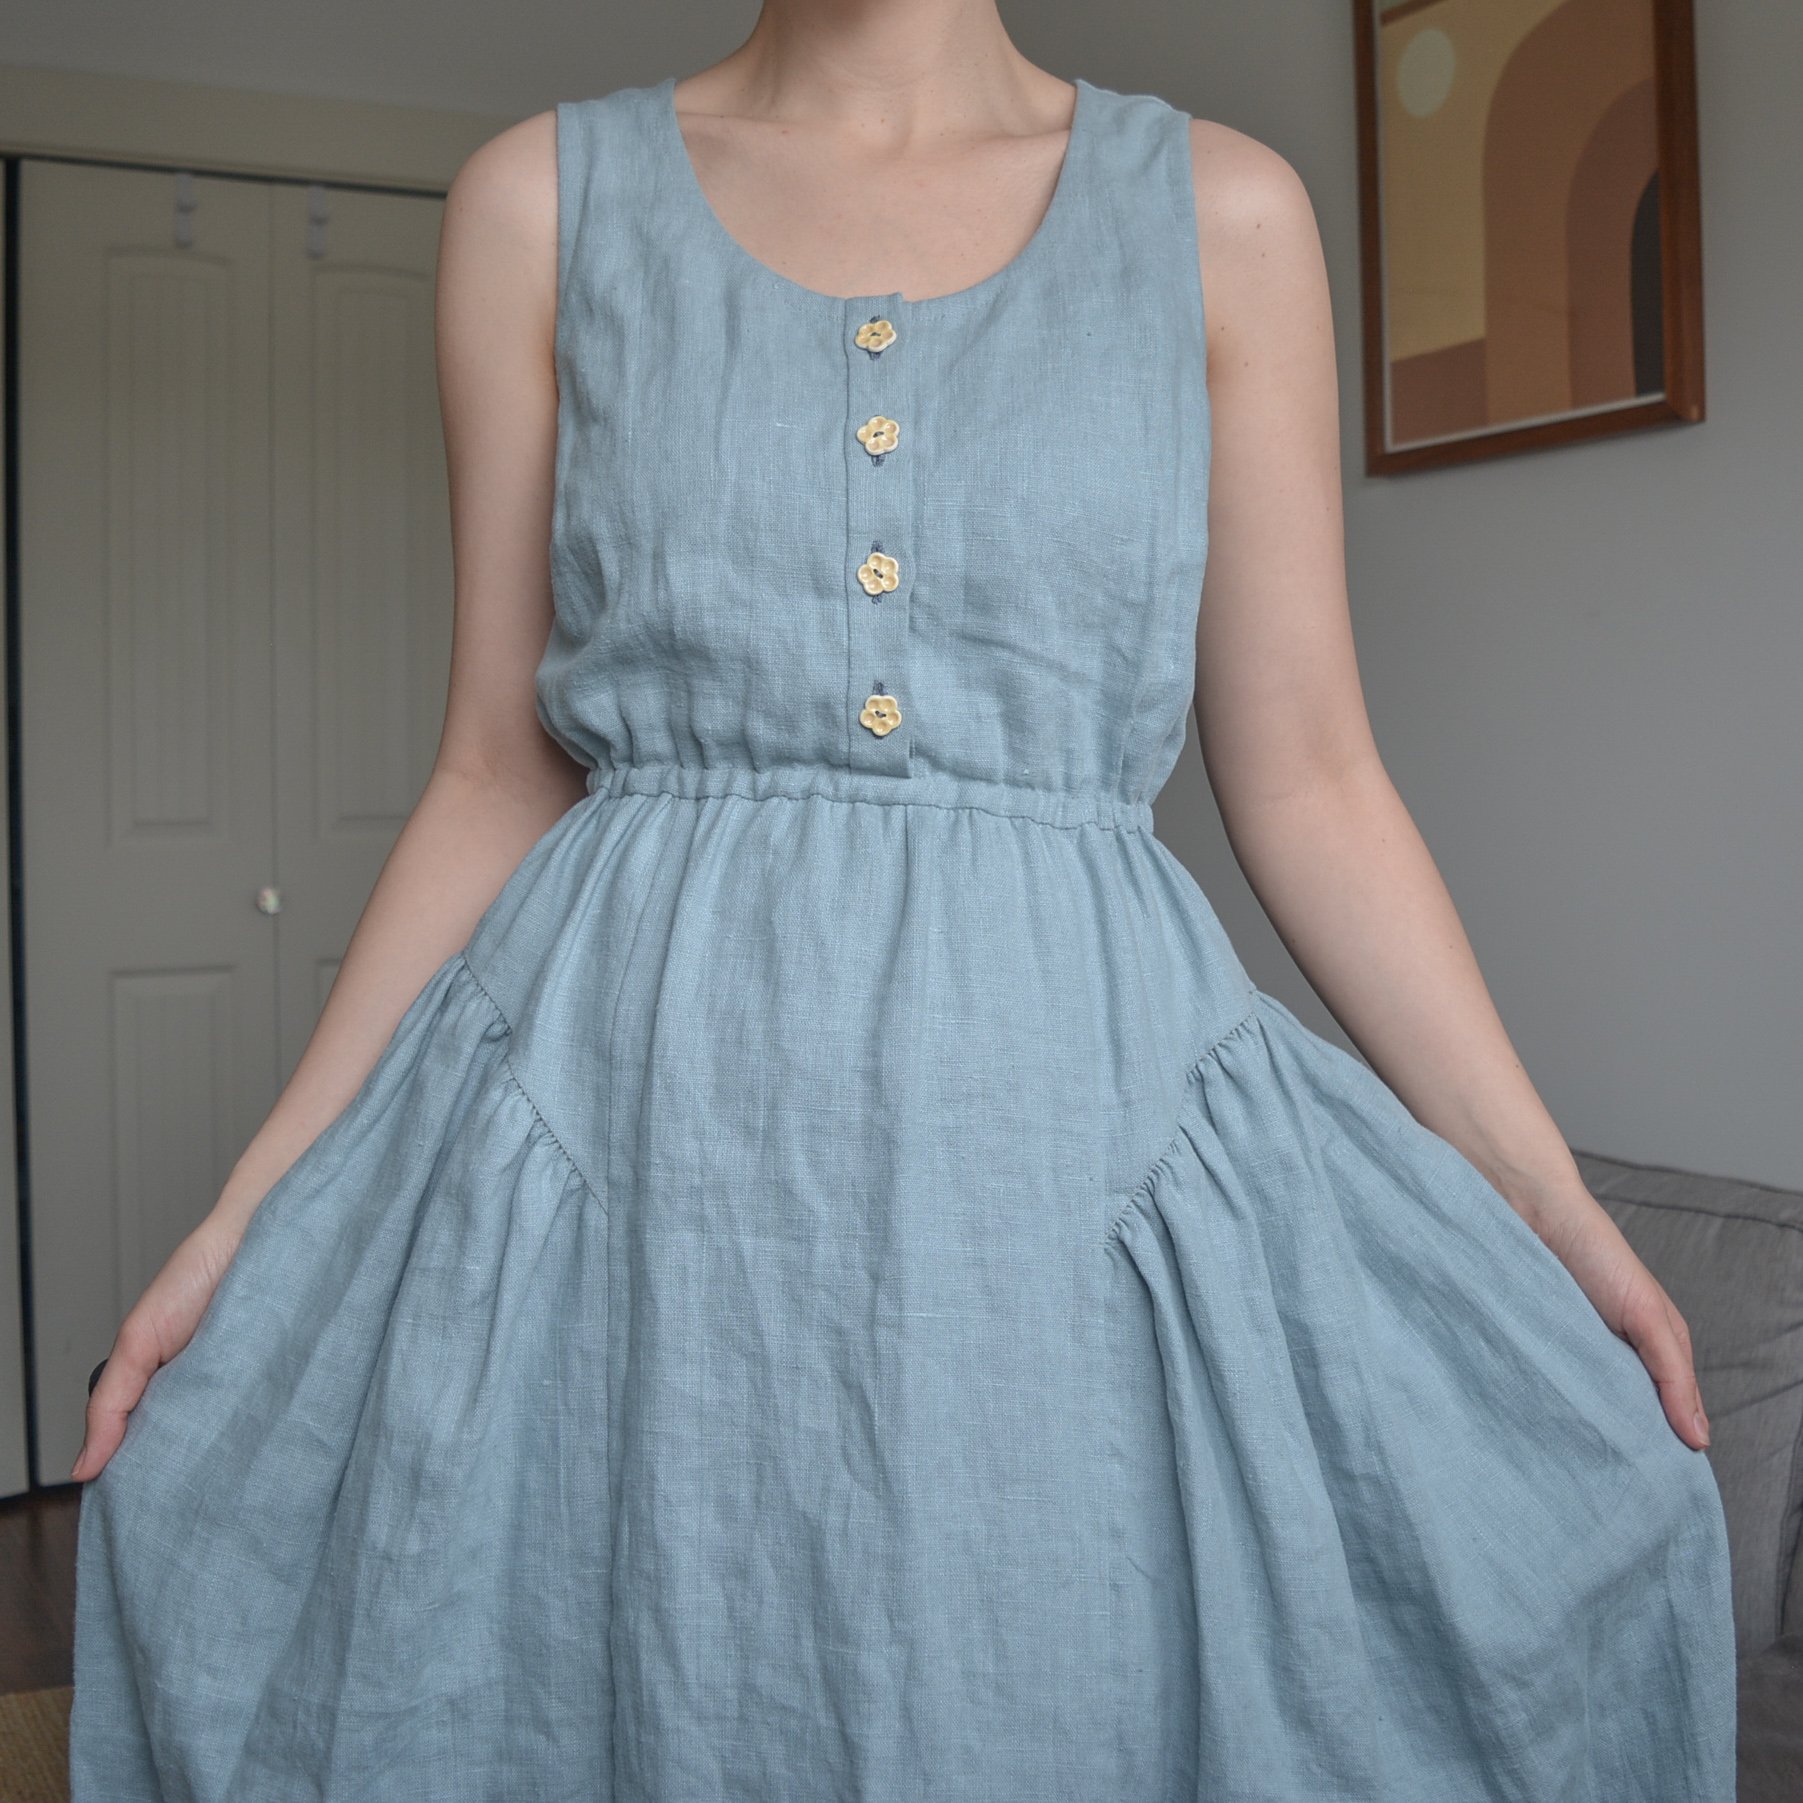
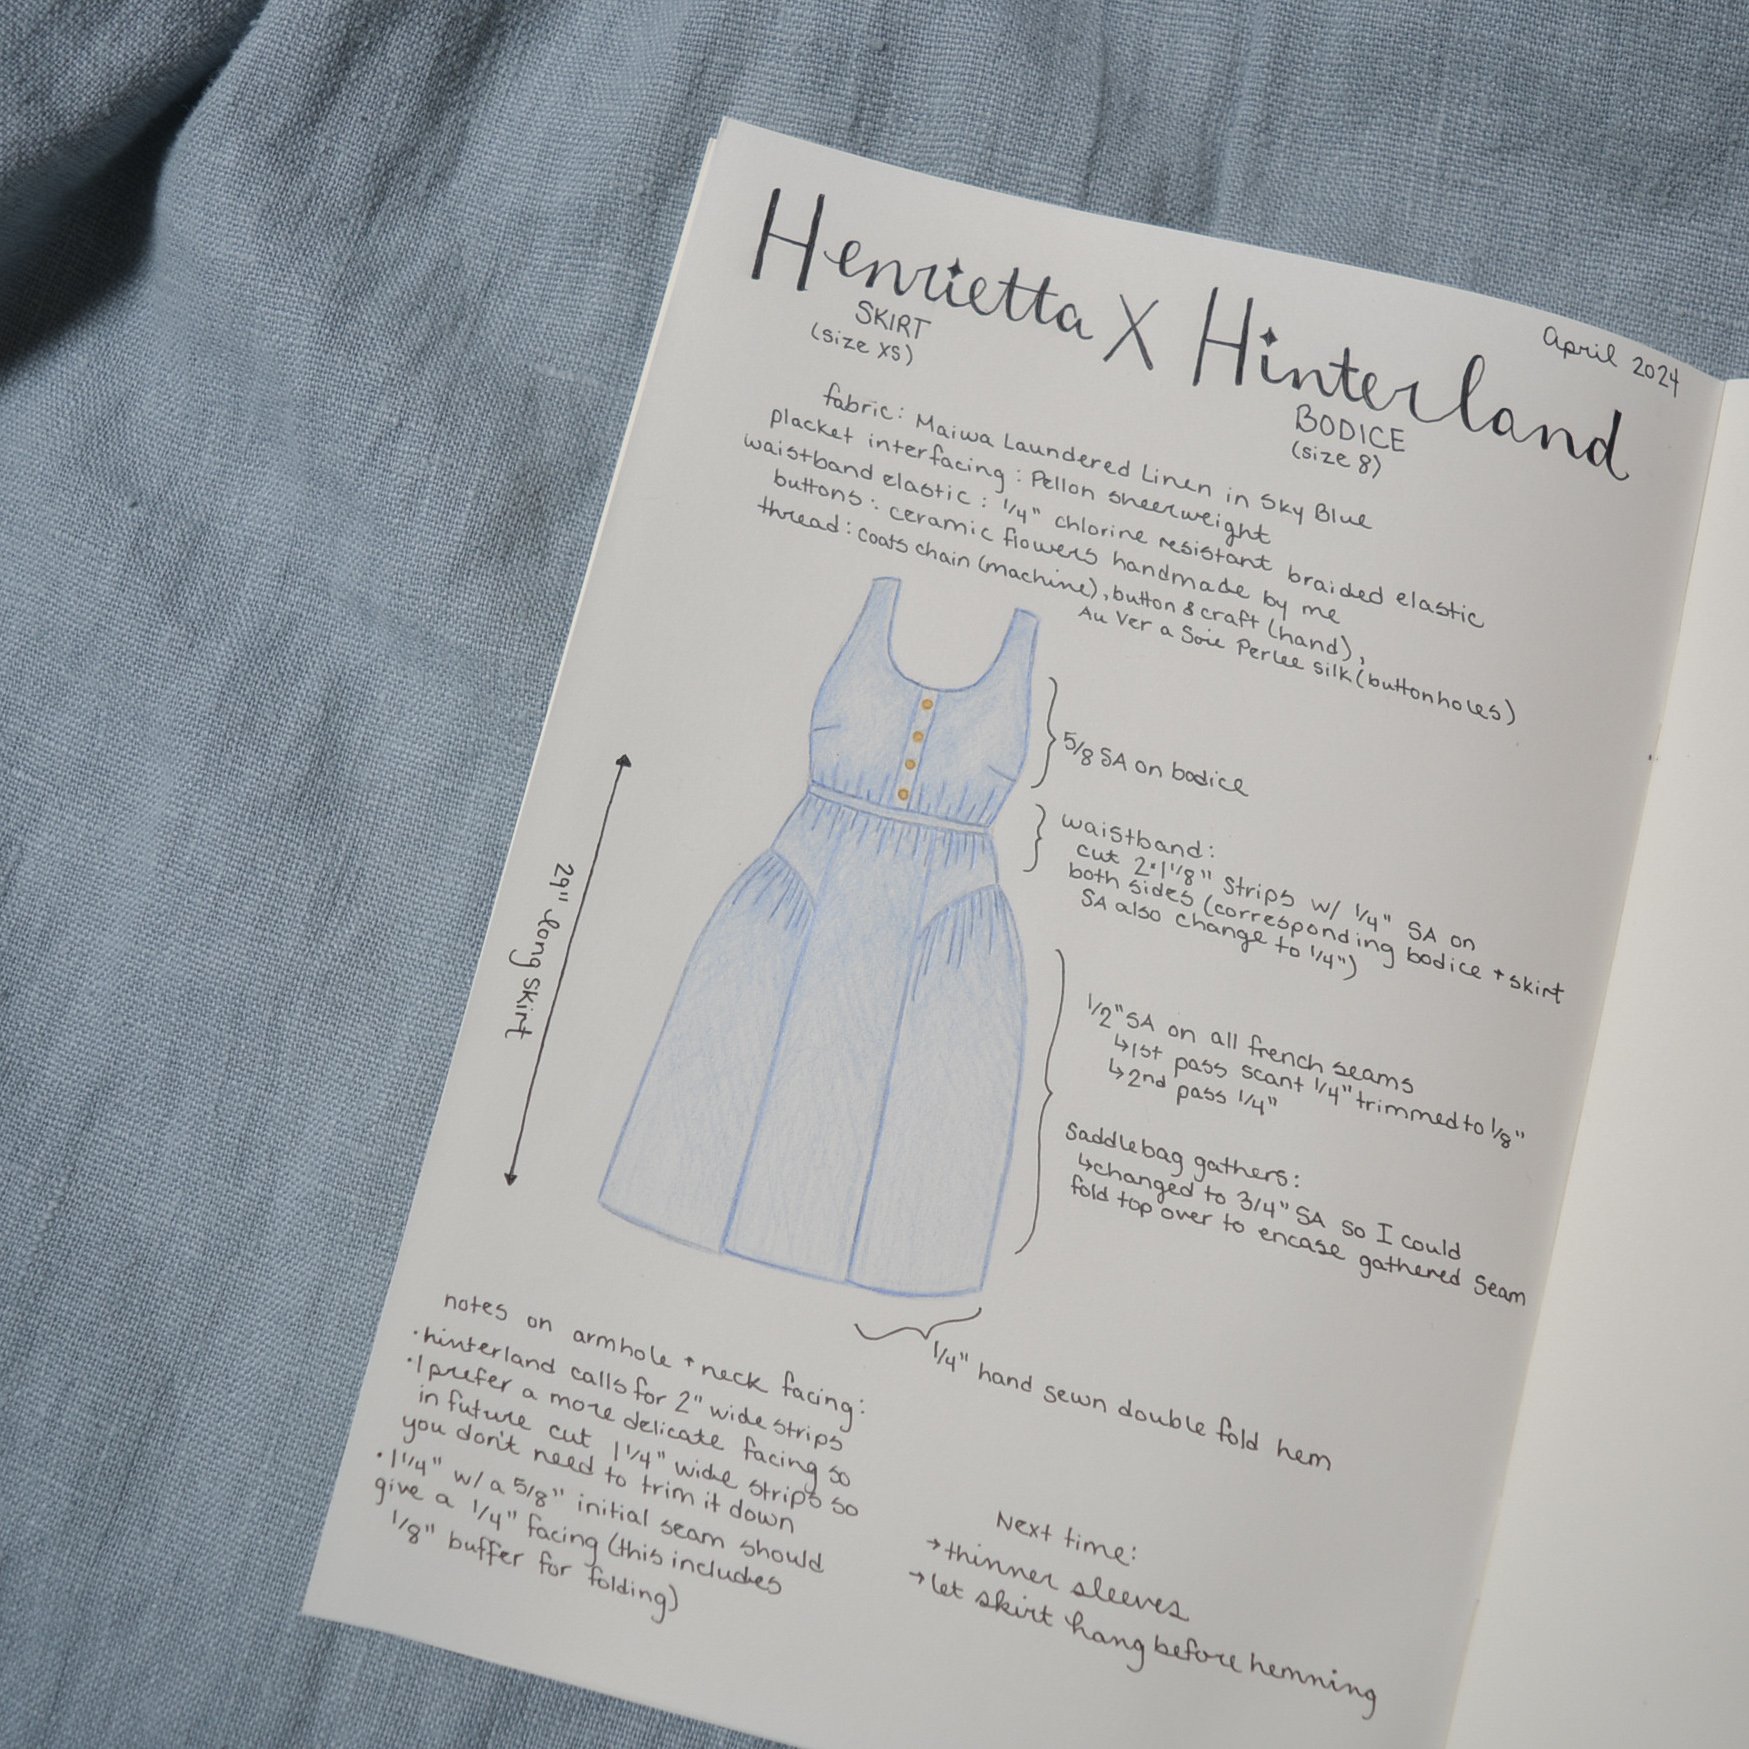
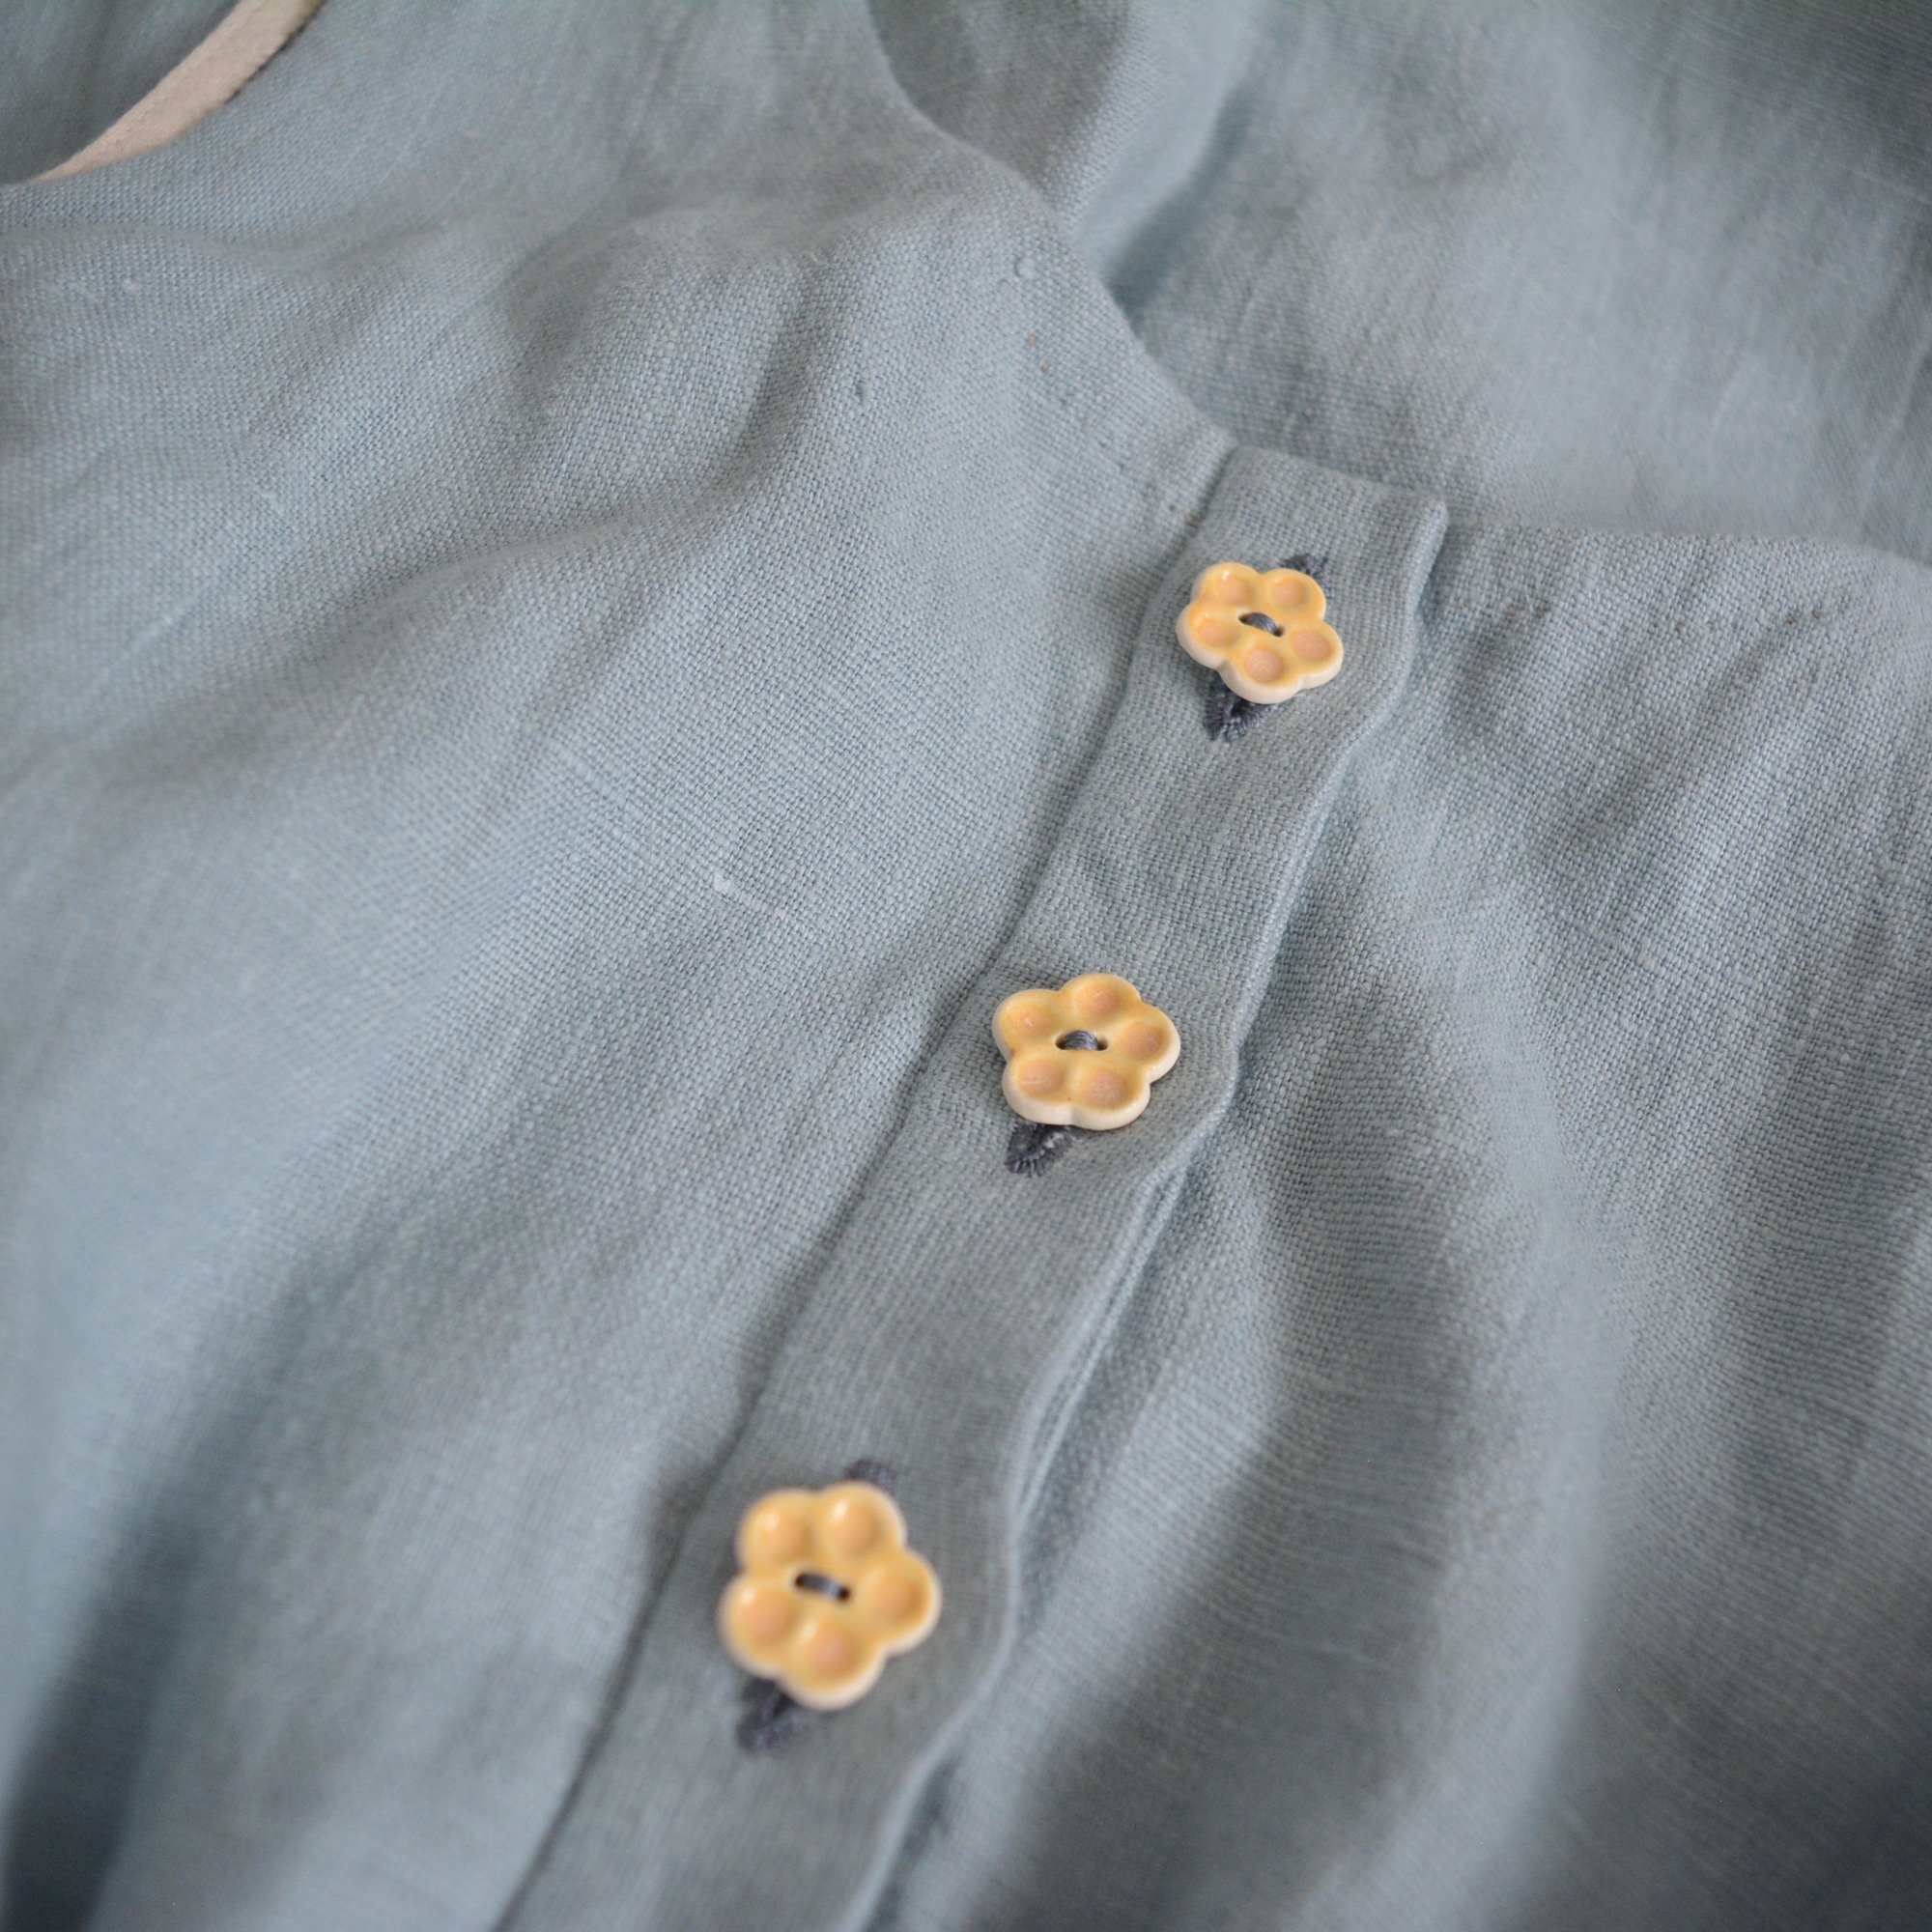
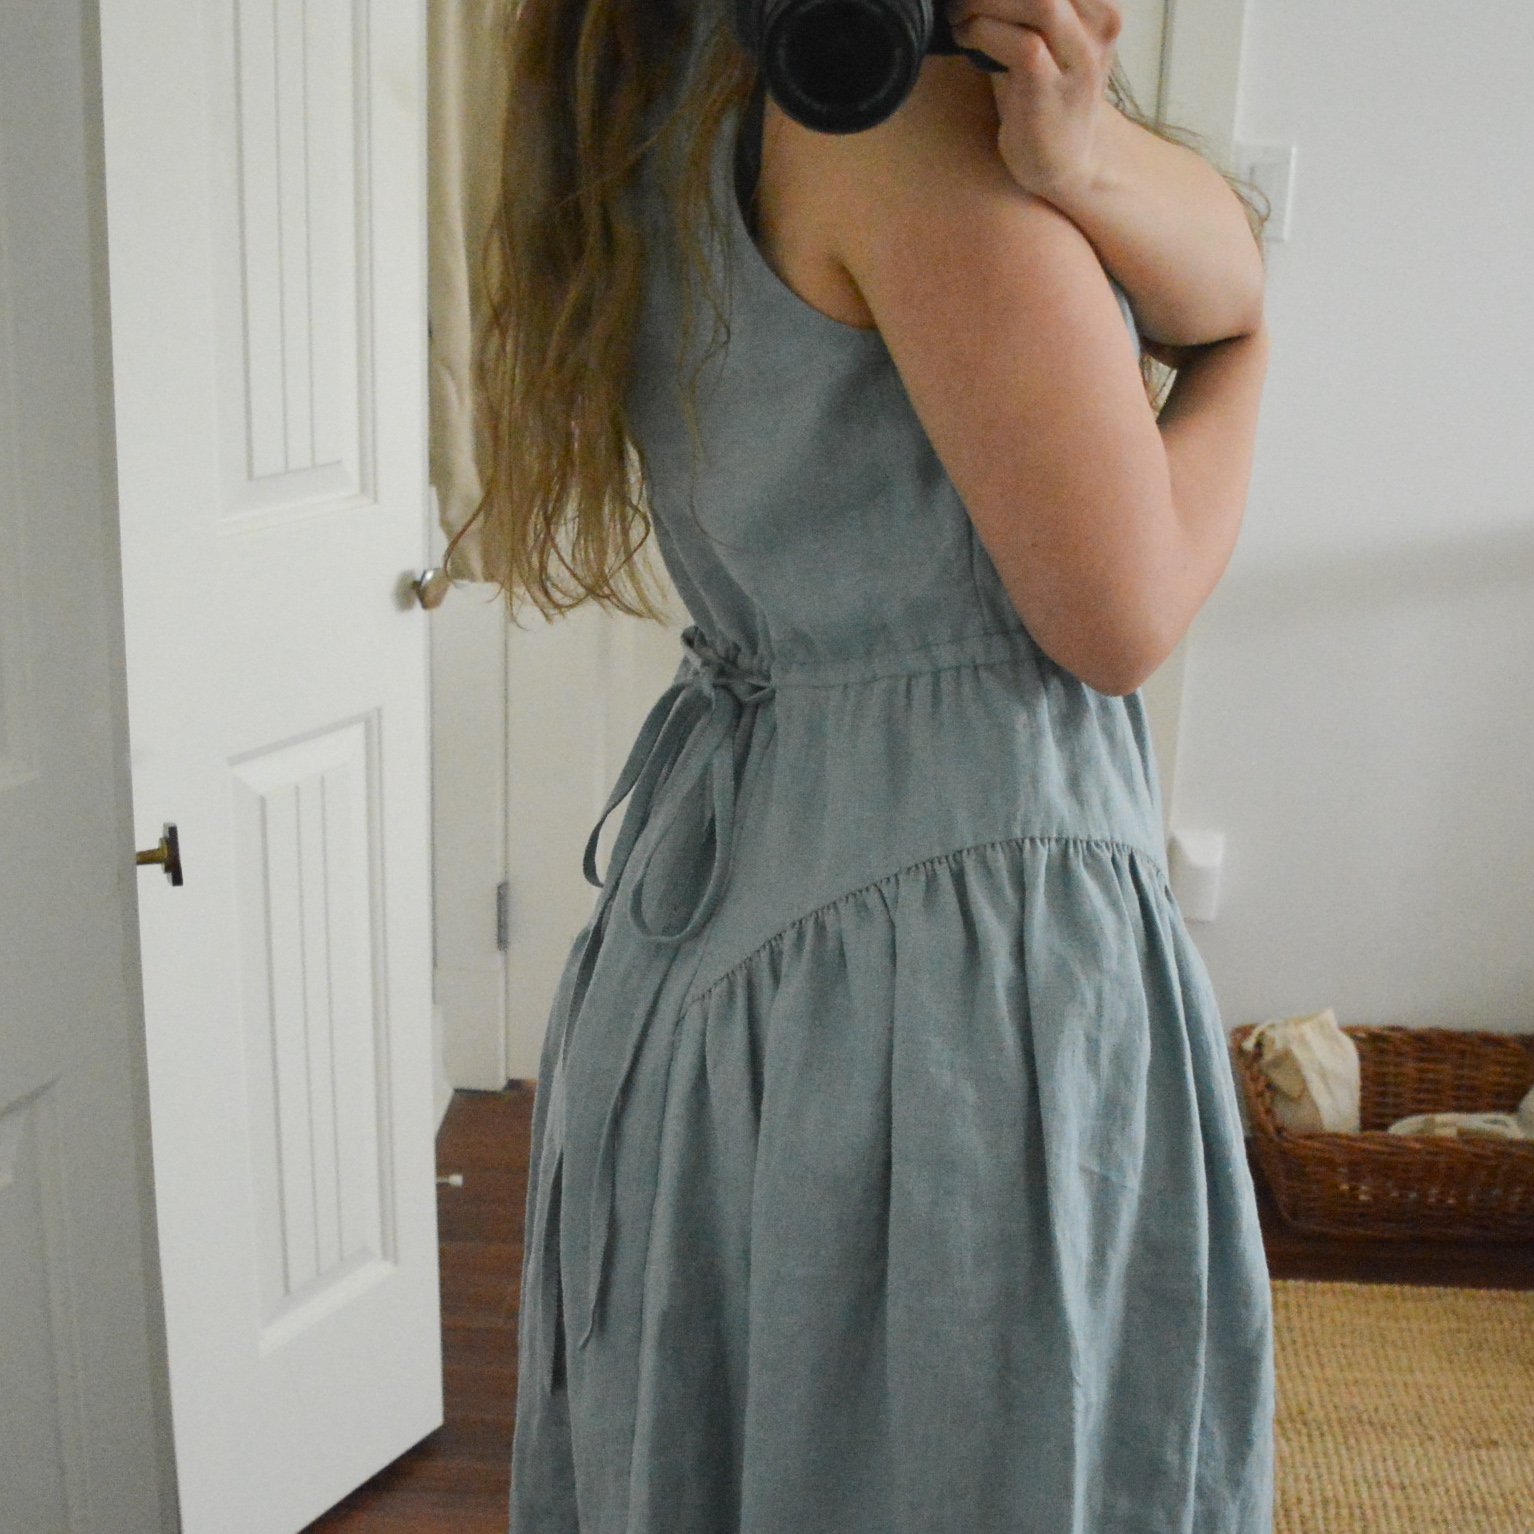
To piece the dress I used Coat’s & Clark Button & Craft thread in brown, and then I felled all of the seams down with a top stitch in the same thread. The binding on the neckline and armholes is sewn on using the same thread and the cretan stitch.

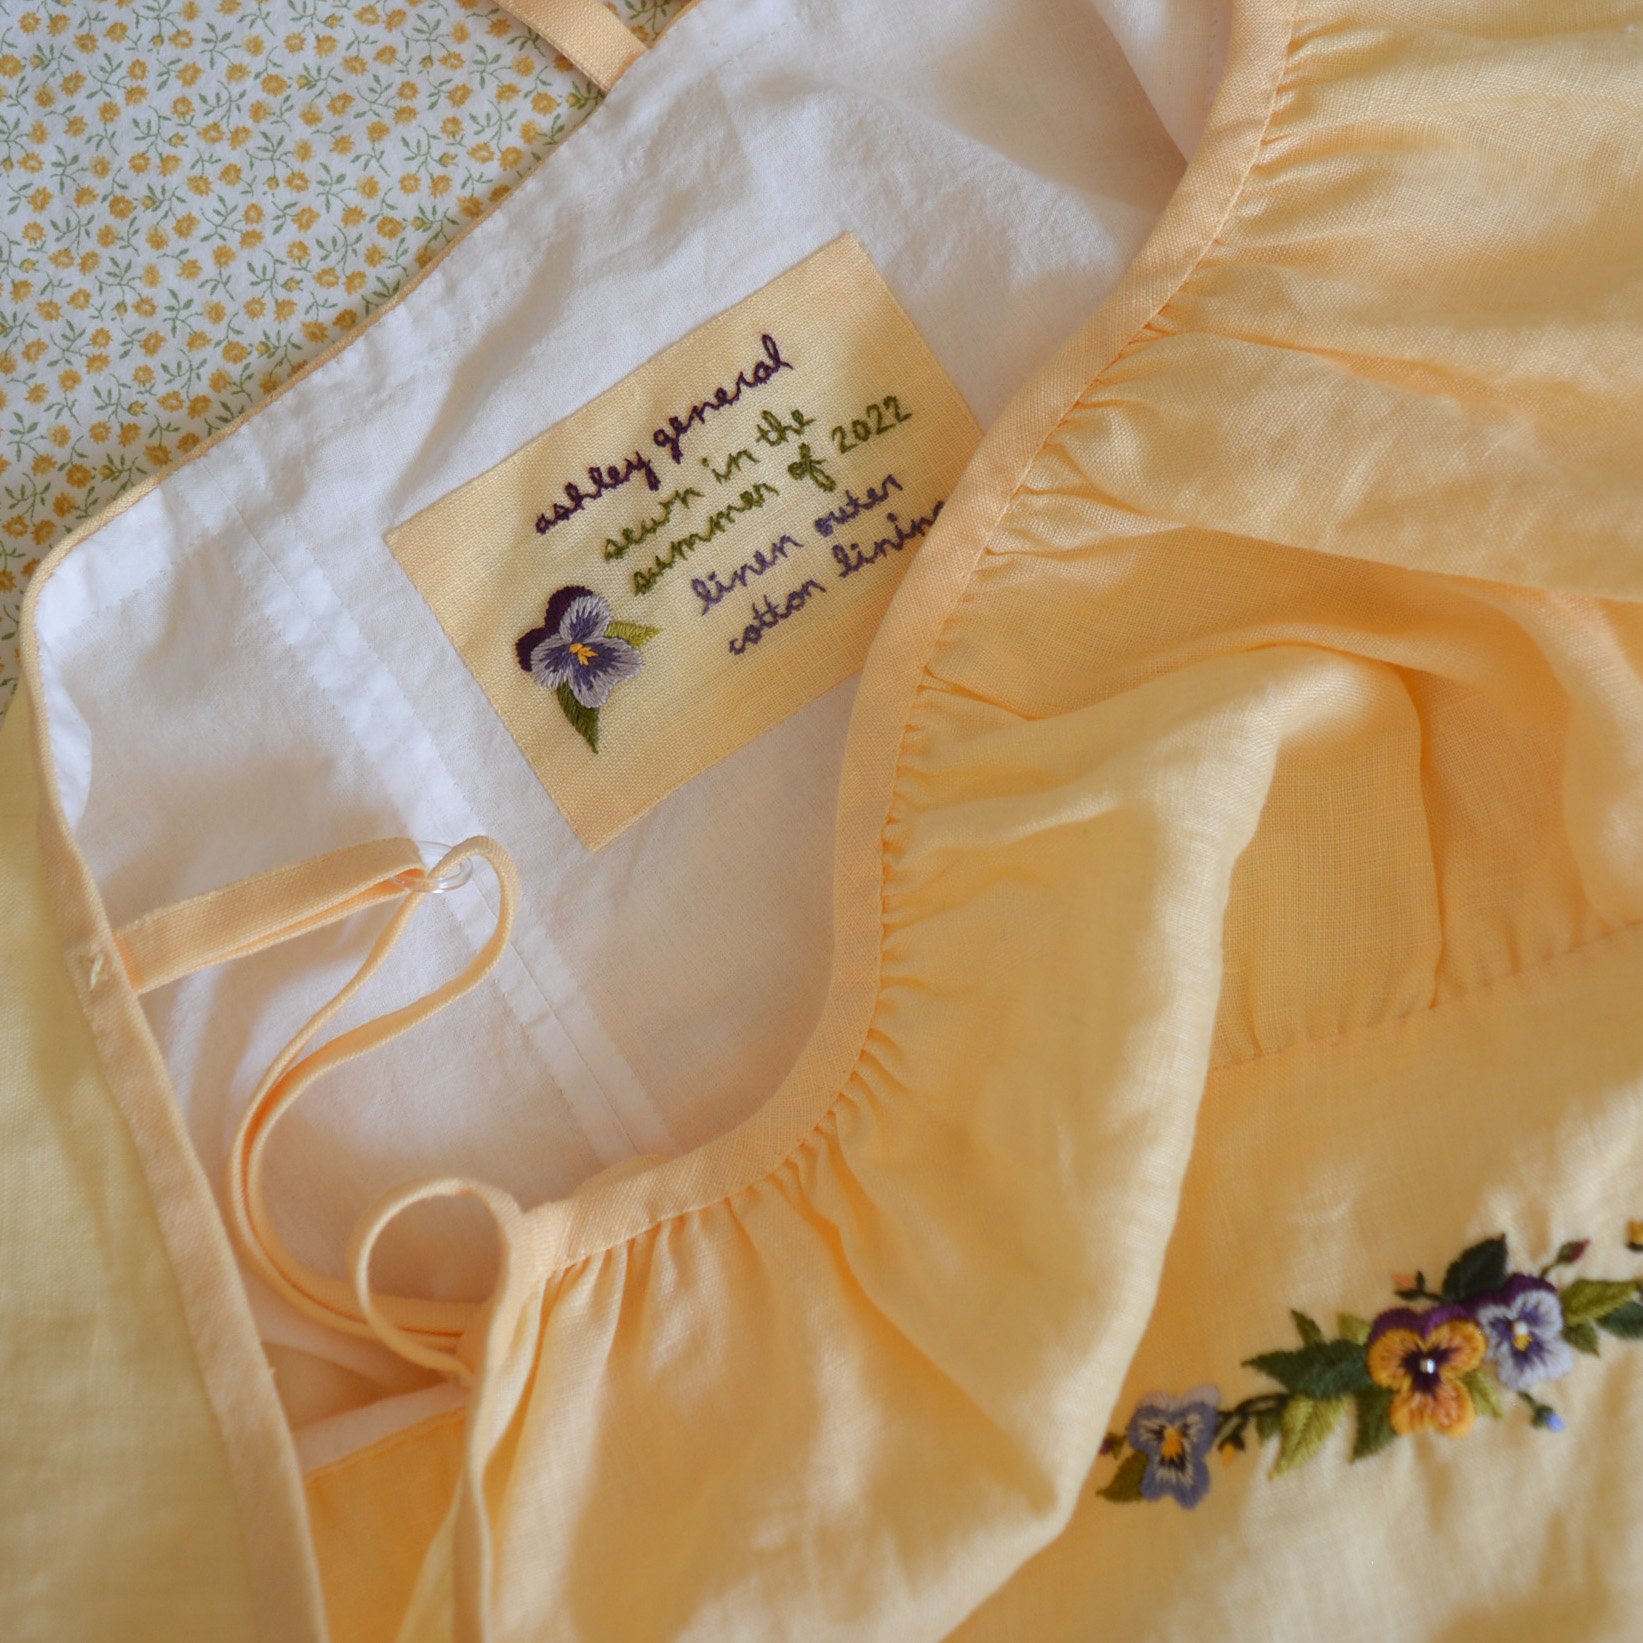
During construction I did end up making a couple modifications to the pattern. I never made a mock-up for this dress so I was crossing my fingers it would fit okay, luckily the modifications I made were very easy to do. I shortened the straps and lowered the armholes by an inch, which essentially just lifts the neckline as it was too low on me. I had also cut a size large from the pattern, which matched my postpartum body measurements, but I am a little smaller now so I took out a 1/2” at each side seam and also graded the waist into more of an hourglass shape. I left the extra slack in this seam in case I ever want to make this dress a little bigger again! I didn’t take too many progress pictures of these modifications, so hopefully I explained it alright!

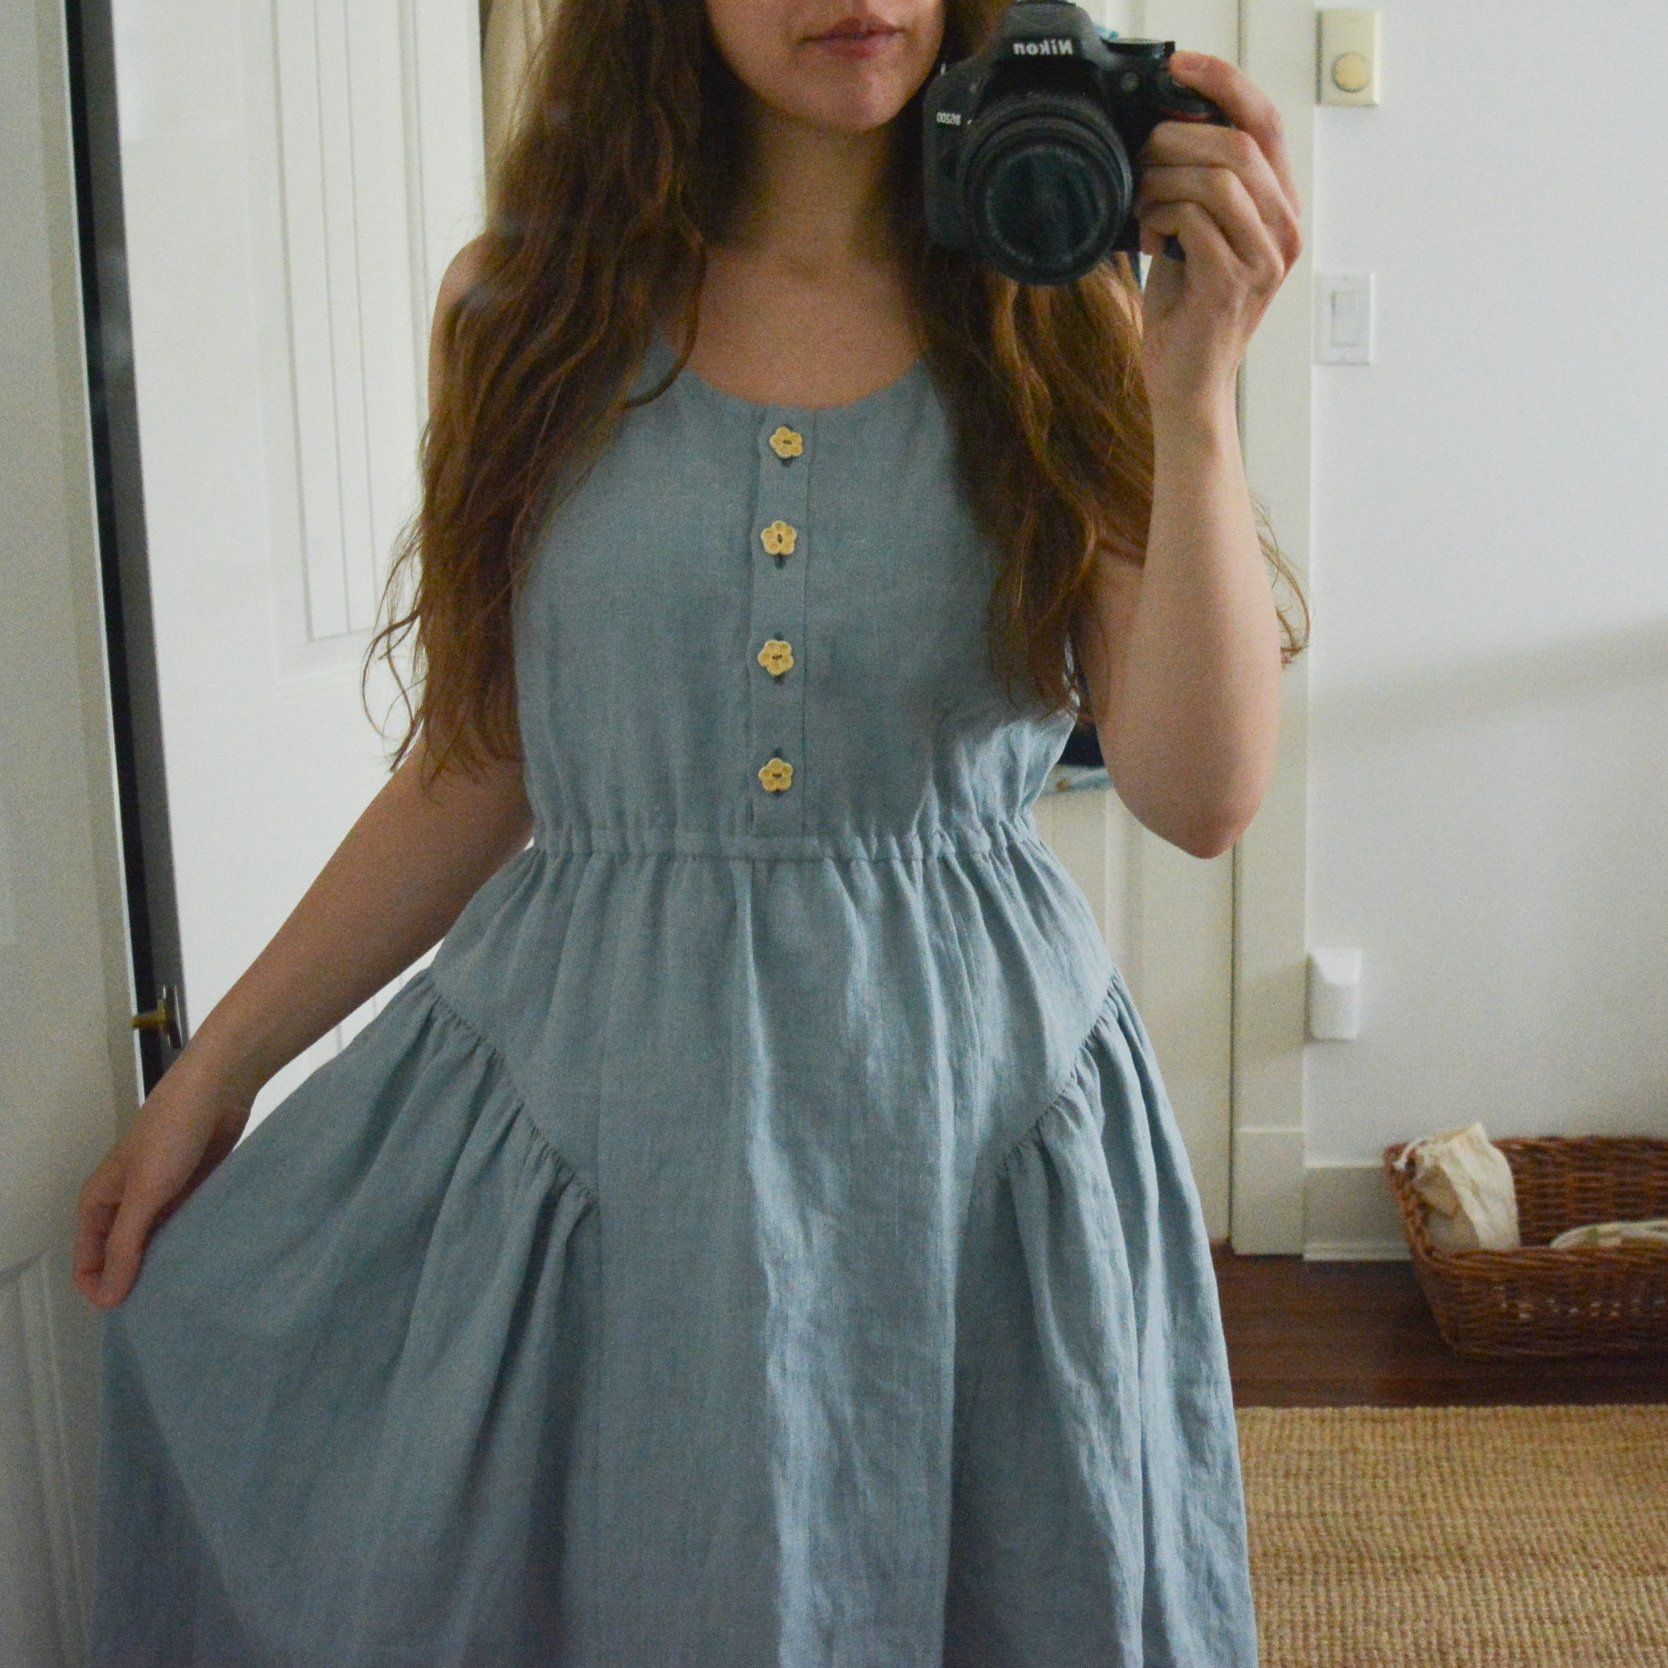
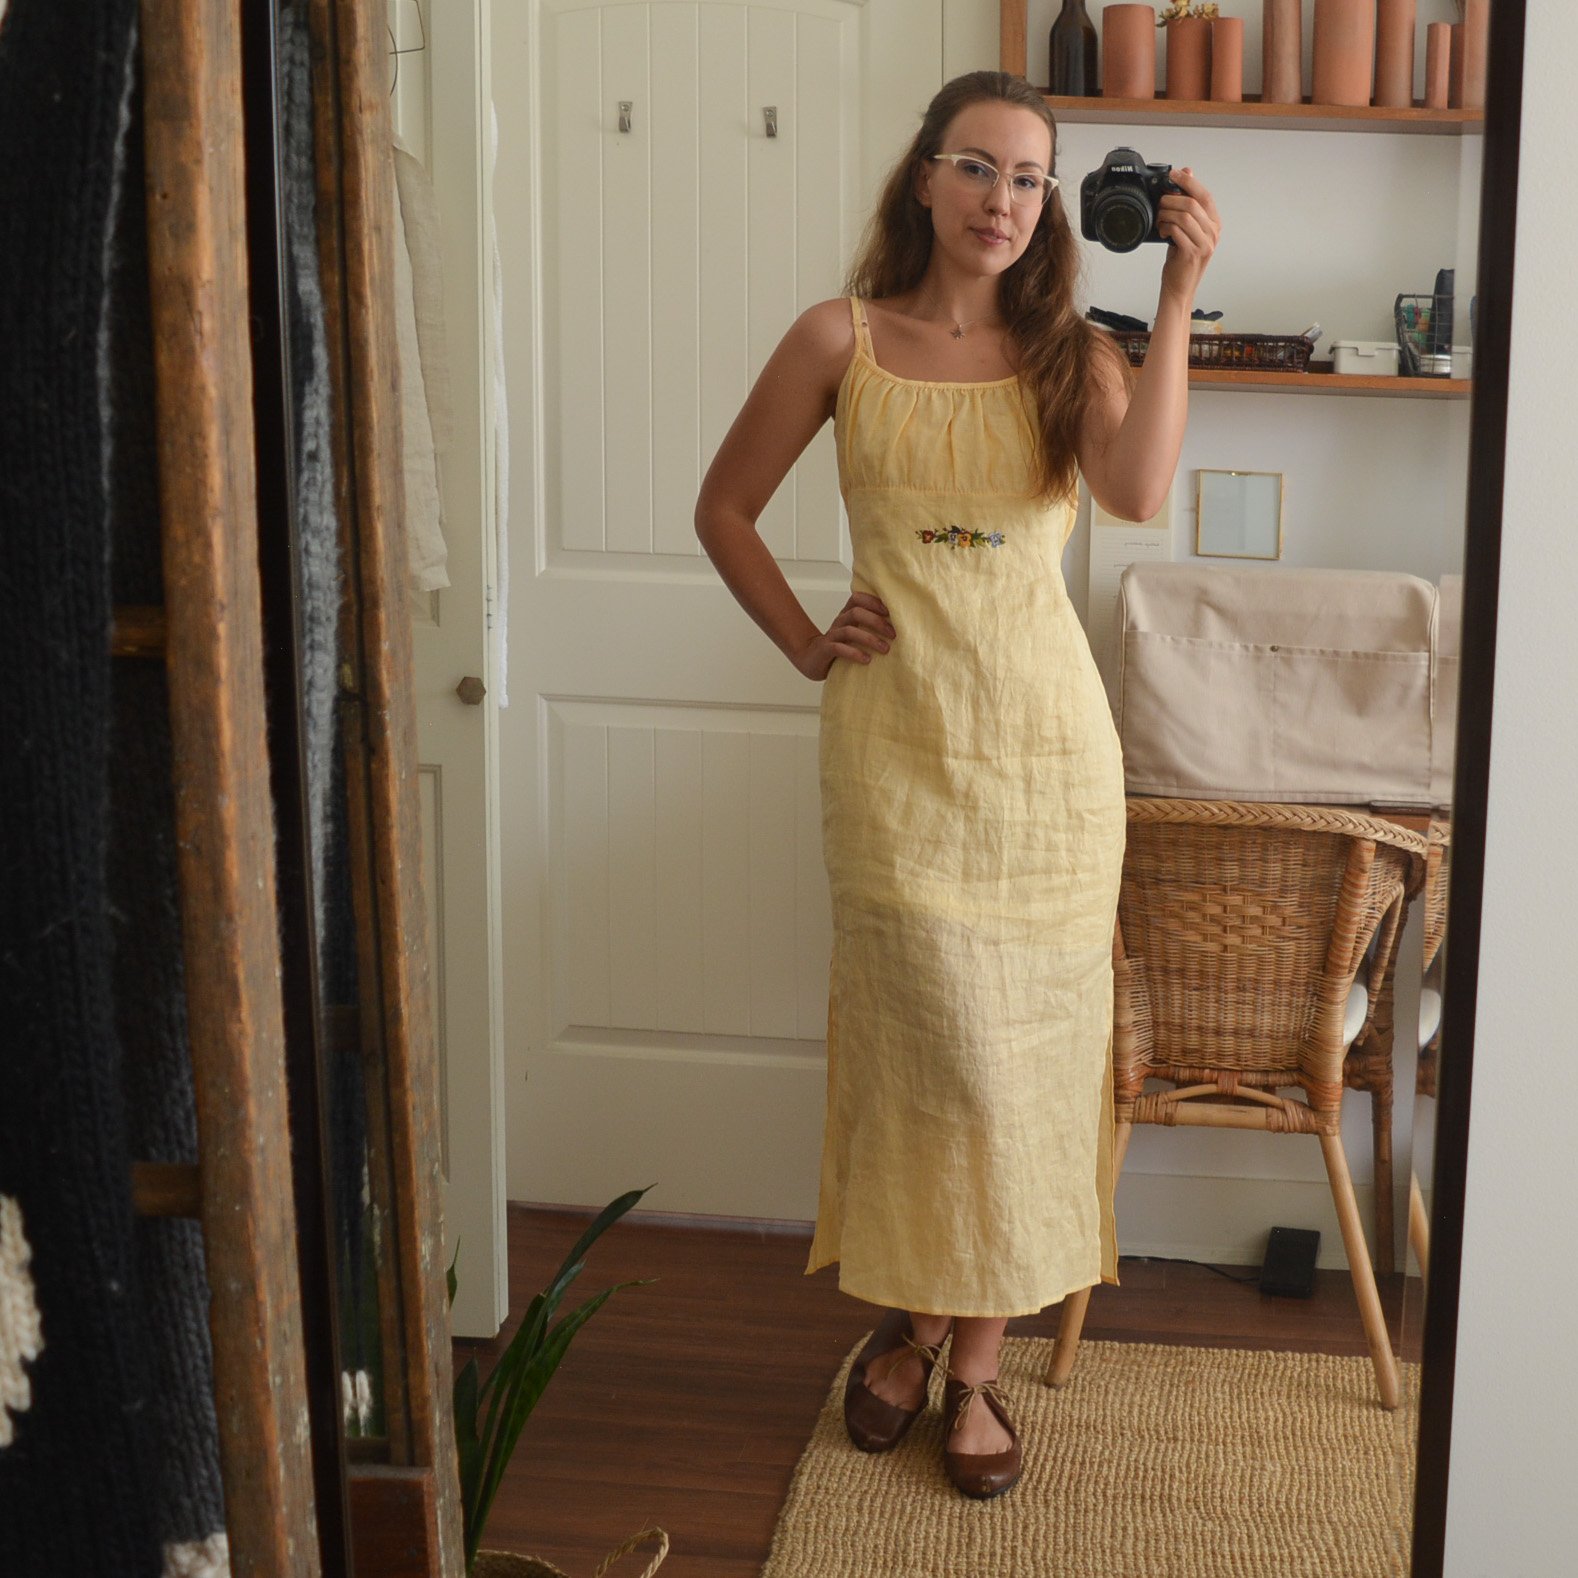
I got to wear this dress out to dinner already. It does feel like a fancy dress both because of the heavy weight of it but also because of the shape and structure of it. The skirt really holds it’s shape well. I will definitely sew this pattern again but next time I will try with just plain fabric and adding a corset tie to the back. And as for the embellishment technique, I am very happy I gave it a try! I loved working with the fabric paint and the stencil, it’s such a great way to give yourself an outline for embroidery. Couching stitch was fun too, although I would not attempt to do it on such a large piece again, maybe just for a camisole shirt instead. Overall the Alabama Chanin style it so unique and fun to play with, I recommend taking a look at the books and giving it a go!

Pattern Mash-up: Henrietta x Hinterland

I made my first Hinterland Dress last year (see it here!) and I’ve had every intention to make a couple more because it really feels like such a closet staple sort of pattern. The pattern has lots of options and so many people have hacked it, in fact the designer even has a course walking you through all the different things you can do with the pattern. So this is my first try at hacking the pattern into something unique. I decided to mash-up the dress bodice with a more interesting skirt, and chose the Henrietta Skirt pattern. This is a pattern from Spaghetti Western Sewing, and oh gosh is it a dreamy skirt. It has gathered side panels that give the skirt so much more volume, which I love not just for the look but for comfort.

Straight-away from the photos you can see I went with the sleeveless option from the Hinterland pattern, and I added an elastic waist. Initially I though I would just use the waist tie like my last Hinterland. When I tried it on it just wasn’t looking right so I decided to seam rip the waist seam and add a casing for some elastic in the moment. I just cut 2 strips of fabric and sewed them between the bodice and the skirt, just enough room for a 1/4” elastic to run through. This worked much better for cinching this heavy fabric than just a tie, although I did keep the tie on the back for the aesthetic. Otherwise I didn’t really change much about either pattern. I sewed all my straight seams using the french seam method, so a couple seam allowances had to be increased to accommodate that, and of course I converted all the top-stitching to hand finishing techniques, but otherwise I kept to the patterns exactly as given.

As for materials, everything came from my stash, which has been a New Year’s Resolution for me. After I use up all my big cuts of fabric you might start seeing a lot of patchwork projects from me for the rest of the year! This blue fabric is the Laundered Linen from Maiwa. It’s a heavyweight linen at 245 g/sm but given its weight, it still has incredible drape. I made my embroidered Myosotis dress out of it a few years ago and I love the way it wears which is why I bought this. This fabric also doesn’t need a lining, and will hold up to embroidery so great. I’ve embroidered quite a few pieces now and honestly I wish I had used a more sturdy fabric for most of them. Embroidery is so much work and I want these clothes to last! The buttons I used are ceramic ones I made last year when I was a member at a local pottery studio. I love these and wish I had made more! And the facing is just a scrap of lightweight linen from my stash.

I am so happy with this dress, it feels so good to wear. I sewed it in about 2 weeks during nap times, which is a pretty quick make by my standards. I have plans to add a bit of simple embroidery to the neckline before summer truly hits and this dress is put into rotation. I’m keeping the embroidery design simple so hopefully I can get that done in the next week or two, more photos to come!

Links:

Fabric: Laundered Linen from Maiwa

Bodice pattern: Hinterland Dress by Sew Liberated

Skirt pattern: Henrietta Skirt by Spaghetti Western Sewing

A Second Sunday Cardigan

When I started sharing my crafts online (almost 10 years ago now!) I pretty much exclusively shared knitting. I had caught the knitting bug and would spend hours every day stitching away. I had a go at pattern designing, yarn-bombing, and plenty of personal knitting projects as well. But these past few years I have been much more focused on sewing and embroidering. I think it’s natural for interests to shift like that and I’m sure in a few years I’ll be focused on something else. I still like to always have a knitting project on my crafting back-burner, it’s a cozy and easy-to-pick-up project in between my other projects. I decided to make a second Sunday Cardigan because I wear the first one so much, and also because I like repetition sometimes. You can read about the first Sunday Cardigan I made here.

I decided to make this second one a more neutral taupe colour, so I used Blue Sky Fibers Woolstok Worsted in the colour Gravel Road held with Lichen and Lace Marsh Mohair in the colour Linen. I knit with three strands of wool, one of worsted wool held with two strands of mohair. Before I started knitting the sweater I took a quick photo of the beautiful yarn. I just checked the date on this photo and I took it in towards the end of 2021, which means this sweater has been my back burner project for two years now!

It turned out absolutely perfect, just like the first. I am a huge fan of this pattern, these sweaters are my two most worn! Will I knit a third? Maybe! But after working on this one for two years, I think whatever sweater I choose for my next one, I will try to start and finish in 2024. Let’s see how it goes!

Knitting Pattern: Sunday Cardigan by Petit Knit

Worsted Yarn: Blue Sky Fibers Woolstok Worsted in Gravel Road

Mohair Yarn: Lichen and Lace Marsh Mohair in Linen

My Sunshine Slip Dress: A Saltwater Slip Pattern Review

So in my usual fashion this pattern review is very belated but I think I will twist that into a positive here: it gave me a chance to wear this dress for a full summer season so I can tell you some things I liked and some things I would change for next time.

This dress idea is not one that was in my project queue for a long time. I basically stumbled across a linen in a peachy yellow shade that just spoke to my heart, and I had to sew with it right away! There are a couple colours that are just like art to me. It sounds strange but I feel like I could just stare at some colours and they will illicit an emotional response, that is what this yellow is! So I impulse bought 3 meters of this linen when I saw it at the store and went straight home to brainstorm. Whatever this fabric was going to become was being pushed to the very top of my sewing queue.

I always keep a list of sewing patterns I want to get around to. I curate ideas quicker then I can sew them so I always have a few on stand-by to choose from. The Saltwater Slip from Friday Pattern Company is one I’ve been excited about since it came out. Simple, a great canvas for embroidery, and I love the bias binding and spaghetti strap details. A sunshine yellow linen slip dress sounded just perfect.

My projects tend to span the length of a season, so this one turned out to be my summer of 2022 project. I worked on it at the beach, on blankets in the park, and at home in the evenings. I added some pansy embroidery (my own pattern) and stitched the dress entirely by hand which made this project very portable. I added a hand stitched maker’s tag to the lining as well. I changed one major thing about the pattern, which was adding a gathered bust (following the ‘hack’ provided by the designer on their YouTube channel: watch here). I also added a cotton half slip lining to the dress, as the linen was a little see-through.

I think that after fully hand-stitching a few garments now, I’ve come to a sort of compromise on how I like to balance both the speed of the machine and the relaxing comfort and portability of hand stitching. Long side seams are better done on the machine, I can easily do them using the french seam method which is such a beautiful finish and just feels so much stronger then my hand-sewn straight seams. Personally I think gathering is worth it to do by hand, even if I am the only one who can tell the difference in the finished piece. I also like to attach bias binding with the machine and then whip-stitch it down by hand so that there is no visible top stitching. And I love the look and feel of a hand-stitched hem. Moving forward this is probably what my process will look like.

As for the fit of this pattern, I’m not sure I will make this again. The side seams of the pattern are curved to match the curves of the body, and as I didn’t make a mock-up the curves don’t actually hit where they should on my body. This could easily be fixed for next time, but I just don’t think a slip dress that only creates shape along side seams really makes sense if you’re looking for a tailored fit. A body is 3D, and so only shaping in a 2D way will never be the same as say, adding darts and shape all around. Especially because there are waist ties sewn into the side seams that pull the seams towards the back when tied, distorting the shape anyways. I think for future dresses if I want something more fitted I will try a pattern that uses bias cut fabric, and if I want something more drape-y I will choose a pattern with a gathered skirt, or a wrap dress, or just something straight cut from fabric that drapes nicely (that I can add a waist tie to if I want shape). Anyways for me I just think there are better options so I don’t think I will try to change this pattern to work for me in the future. Although I learned a lot and I will still wear this dress, it’s just not the perfect fit that feels like it will become a closet staple.

Pattern: Saltwater Slip from Friday Pattern Company

My Christmas Make - Stockings!

This year for Christmas I didn’t sew any Christmas gifts, but I did make something for my growing family. A beautiful set of Christmas stockings! I used the pattern from Frux Studio, which was so lovely to sew up. She based her design off of medieval fairy-tale villages in the Alsace region of France, and they really are so charming. I stitched our names onto the stockings using chain stitch. One for my husband, one for me, one for our baby Josey, and I even made one for our pup!

The base fabric I used was a cotton herringbone coutil I had in my stash, but any heavyweight fabric or canvas would work. I have plenty left over if we ever need to add another stocking for another babe or furry friend. And for the contrast fabric I chose some scraps from my pile of naturally dyed linens. The linings are also random fabrics from my stash that co-ordinated well enough. This was a great project to use up fabrics and thread that I already had. I highly recommend this pattern if you are looking to sew up a set of stockings for your family. Merry Christmas!

Frux Studio stocking pattern: PDF Pattern